Wednesday, November 23, 2011

Here It Comes

 This year's first plowable snow. 


 And the first images I have captured of our Fearless truck in the snow . . . showing some teeth courtesy of the customized paint job Henri added to the plow.   


I took these a couple hours ago, and it's still coming down out there.  Happy Thanksgiving everyone! 

Sunday, November 20, 2011

Manual Labor

Has it really been 3 weeks since I last posted?  Since then, I have been out practicing with my camera. It was finally time for me to take the big plunge and convince myself that moving that little dial on my camera to Manual mode would provide me with a new challenge that would be good for me.  So I did it.  And I was frustrated for a while, but determined to get past it, promising myself that I could go back to the Auto mode if it still didn't "click" for me after giving it a week.
             
What I found, was that I am lazy about reading and all that information about ISO, Aperture, and Shutter Speed and trying to figure out how they all relate to each other was almost too much for me.  Yet somehow,  I got past it and found my own unique way of playing with my settings until I was able to capture a picture I was proud of.  And you know, that felt really good.  So I continued.  Below is a shot of the fountain over in Bar Harbor where I became fascinated with the droplets of water. 


Okay, I went a little overboard with my fascination of the water and shot two more of that same fountain. 


I realize these aren't really that interesting, but my need to document it, is so I can look back on them in the future and hopefully see improvement. 


My attempt to capture something in motion  (for practice, just in case I panic when I spot an eagle and want to revert back to Auto mode).


Or just in case we have a really big storm, I need to practice my timing of the crashing waves too. 


I want it all to become second nature to me. 


And someday,  I hope to capture the way the setting sun sometimes fills up the cabin of a lobster boat and makes it look like it's on fire. 


But for now, thanks so much for indulging me with my new found interest.  I have lots to learn and work on, but I can't help but feel a sense of freedom of taking that first step away from relying on my camera's Auto setting.  

Thursday, October 27, 2011

The Crowning Touch

Michael over at Inspired By Charm is hosting a link party today where he has invited his readers to join him in sharing a makeover inspiration from a thrift store find.  Here's a close up of my entry. 


Can you guess what it is?  Or was? 


What it was, was a dispenser to keep rolls of either foil, plastic or wax paper handy in the kitchen.  Below each spindle is a bar with a serrated edge for cutting.  It was priced at $1.99 from my local Goodwill. 


It's new purpose will be to help inspire me in my craft area. 


It will be mounted on the wall of my newly redone space and I will use it as a place to gather and hold adornments for the crowning touch on my future hat creations. 


But there is another reason why I want it in there. 


Because it was inspired by the memory of my Grandmother Mayfair, who passed away 29 years ago today, who I can still envision all dressed up and wearing a hat. 

Linking up with Michael at Inspired By Charm. 

YourSiteTitle


Wednesday, October 19, 2011

Home Made Dark Chocolate Nonpareils


Sometimes I just crave these.   Although you may know them as "snow caps." 


Making them at home is so simple.  Get out your double boiler and pour a half bag of Hershey's special dark chocolate morsels in the top.  I don't have an official double boiler, so I use one of my sauce pans with a tin mixing bowl.  They get all melty in just a matter of minutes so as soon as you see them start to melt, stir and go ahead and remove the pan from the heat. 


 Next, just pour your sprinkles into a small shallow tray. 


Then drop half teaspoonful circles of the melted chocolate right on top, making sure you have a nice bed of nonpareils (sprinkles) underneath.  If they are too shallow you won't get an even coverage and they may stick to the bottom of your tray.  (Just don't ask me how I know this.) 


Then, very gently shake the tray a little from side to side to help level out the chocolate a bit.  Some of the circles will turn out a little larger than others, just be careful to leave plenty of room so they don't touch each other.  (But don't worry, if any of them happen to accidentally stick together, I recommend you just pop them into your mouth, no sense flaunting our mistakes.) 


Then put them in the fridge for about 10 minutes or so and that's all there is to it!  I've tucked a few into a little French inspired box for later. 


You want some don't you?   So did I.  It's a bad craving.  Here are some more colorful ones I made. 


Yesterday's sunset at Sullivan Harbor. 


A sweet place to walk off the calories of my bad cravings.  N'est-ce pas?

Thursday, October 13, 2011

The Arrival of Fall

It was still pretty green here last Thursday when I made my first apple pie of the season.  But for some reason the smell of apple pie coming from the kitchen is a signal to Henri that leaf peeping must begin immediately. 


Just needs the top crust and into the oven it will go.   But my mind was on an early rise in the morning so this is the last you will see of the pie.  For the record, it was YUM. 


The next morning, we were up before the crack of dawn and headed to the Western mountains of Maine with our sights set on Rangeley.   The foliage was at full peak, even though my attempts to capture it were thwarted by the glare and shadows created by the noon day sun. 


While parked and enjoying our picnic lunch, we watched as this seaplane descended and I managed to find my camera just in time to catch a shot of it's water landing. 


One of Henri's captures. 


He even found a white pumpkin for me in Rangeley and then later, surprised me with a carving.  Check out my newly created galvanized pedestal stands that I'm using to display my pumpkins.   All it took was riveting some affordable hardware store parts together with some flan pans I found at Goodwill. 


The green pumpkin is a cross between a buttercup and a blue Hubbard. Using dried hydrangeas and zinnias from my garden, I had fun arranging them into fall vignettes, tucking them into a rustic, wooden tool caddy I found while thrifting. 


This corn is from last year.  Glad I saved it as the colors are still pretty vibrant. 


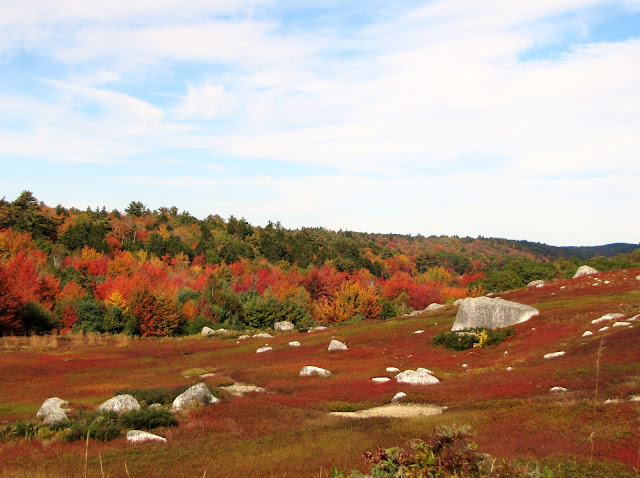
 I took this picture just yesterday over in Blue Hill of the blueberry barrens just coming into color.  Soon it will be peak foliage here too. 


A shot from Sorrento Harbor, where rain is in the forecast, after our nearly week-long stretch of warm, sunny weather.   


But this rain is really just a figment of my imagination.   The above photo was made using a free stock texture found here and pairing it with my own photograph by using the software program called Gimp that you can download for free here.  Pretty cool, huh?

Friday, September 30, 2011

It Was Love At First Sight


So Henri finally got his truck. 


And sort of a new look to go with it. 


Well actually it was my idea to take some Fall inspired shots with it on our way back from town. 


Lest you think this is our backyard, I will tell you the backdrop is really of a saltwater farm right up the road from us.   


We had just come back from town where we picked up some Fall decor for outside.   


Only thing is, I think I like the way it looks inside the truck. 


Tailgate up or not.  Just between you and me, I am more than a little smitten with it too.   Hayride anyone? 

Tuesday, September 20, 2011

Adding Romantic Touches to My Tiny Greenhouse

My backyard greenhouse measures just 6' x 8' and with the exception of the added trim embellishment to the top, it is straight out of the box.  The trim is plastic garden edging (found at a thrift store for a dollar) that I spray painted silver. I adore the touch of romance it adds to the overall look. 


It's rather late in the season for allysum, but here it is still blooming in one of  my concrete cherub pots that flank each side of my greenhouse. 


The other one holds beautiful penny denim violas that have been blooming since early spring here too.  They were in the shade up until a couple weeks ago when I had the idea to make them a focal point for my greenhouse. 


Any violas that I accidentally uproot now and again get added as floating flowers to a tarnished silver plate bowl right alongside my other potted plants. 


It would be a shame to just throw them on the ground when they are still so pretty!


Same goes with my zinnias that I grew from seed for the purpose of cutting.  I end up enjoying them right where they are planted inside our huge garden tee pee. 


But the ones that veer off sideways, or get broken stems, end up as floating pretties too. 


A closeup showing the fleur de lis pattern of trim on the top.  Notice that peek of my new hydrangea tree (a birthday present from Henri) that is planted outside of the greenhouse. 


It's a Limelight Hydrangea that is hardy to Zone 4!  Surprisingly hardy for something so beautiful and delicate.


Enjoying more zinnias inside vintage bottles added to a galvanized tray carrier I found at Sweet Pea Gardens.  


With a technique I learned  from a post over at Heaven's Walk, here's a close up of a clay pot I altered with a free French graphic I found over the The Graphics Fairy.


It's potted up with some fragrant oregano.  I wish I remembered the variety, as I adore the purple shade on the underside of the leaves. 


See my tiny chandelier hanging at the peak?  It holds a rose scented votive candle that adds to the heavenly fragrance in here!


Thanks for stopping by to see what I've been up to.  Hope you have enjoyed your visit as much as I've enjoyed being able to share it with you!